How to Use Zoom
Zoom is a video conferencing software, available on Windows, Mac, Linux, iOS and Android devices.
Installing Zoom
Logging In
Scheduling a Meeting
Joining a Meeting
Meeting restrictions
Meeting Window Views
Sharing Your Screen During a Meeting
Managing Participants
Recording a Meeting
Chat
Dividing Participants into Groups
Securing Your Meetings
Videos and Further Instructions
Installing Zoom
University of Vaasa staff
If you do not already have Zoom installed on your computer, you can install it using Software Center (Zoom Client for Meetings). Install also the Zoom Plugin for Microsoft Outlook which enables you to use Outlook for creating meeting invites.
Others
Install Zoom Client for Meetings software from: https://uwasa.zoom.us/download
Also install Zoom Plugin for Microsoft Outlook if you want to make invitations using Outlook.
Mobile Apps
Zoom is available on App Store and Google Play, direct links to downloads here: https://uwasa.zoom.us/download (section Zoom Mobile Apps).
Logging In
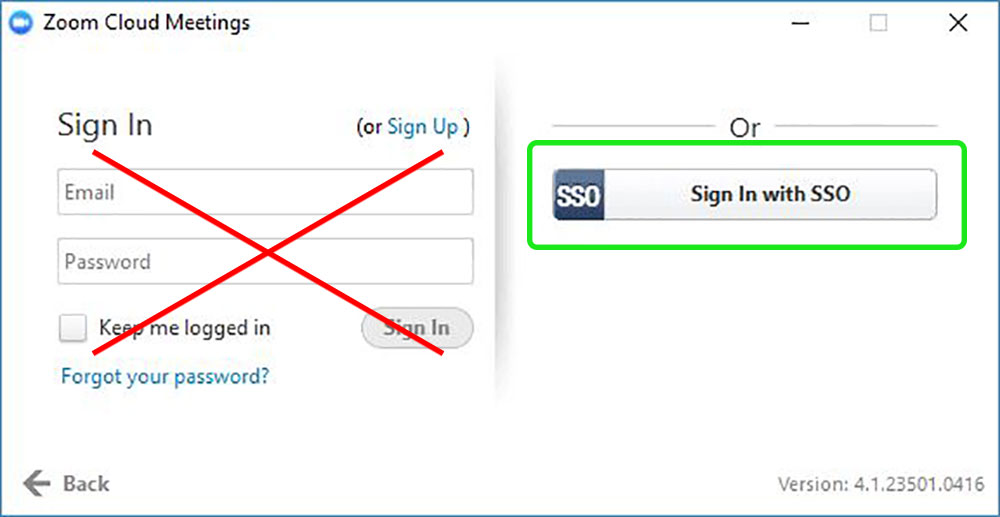 The staff and students of the University of Vaasa log in to Zoom using SSO (Single Sign-On).
- Upon starting the Zoom app choose Sign In With SSO.
Staff computers will make this choice automatically, proceed to step 3. - Add uwasa to Enter your company domain field and click Continue.
I.e. the full adress: uwasa.zoom.us - Log in with Univeristy of Vaasa user name and password in the opened browser window
Zoom will remember your login details after the first time the app is started. You can log out from Zoom by choosing Sign Out from the app's status menu (icon with your profile picture or initials) on the top right of the Zoom home screen.
Scheduling a Meeting
Using Outlook
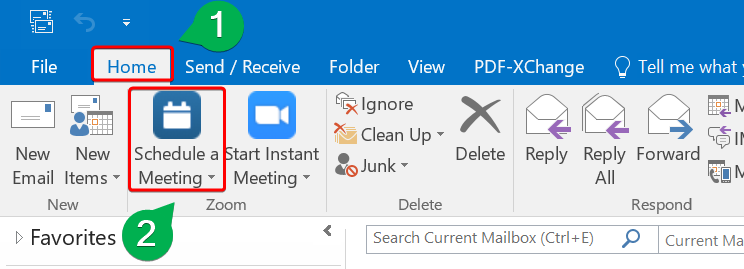
Once the Outlook plugin-in for Zoom has been installed, on "Home" tab you can click Schedule a Meeting button on Outlook's top menu to start inviting people to a new Zoom meeting.
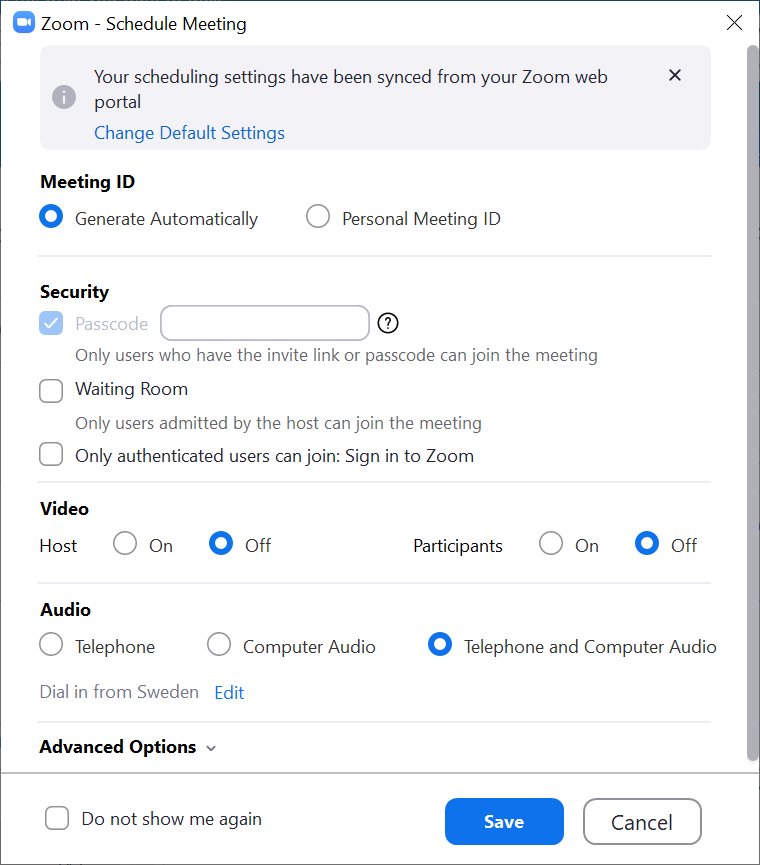
Clicking the button opens a window with settings for the meeting in Zoom. The default settings do not necessarily need to be edited. The settings can be set to use the chosen values automatically by choosing Save and do not show again from the bottom-left corner of the settings window.
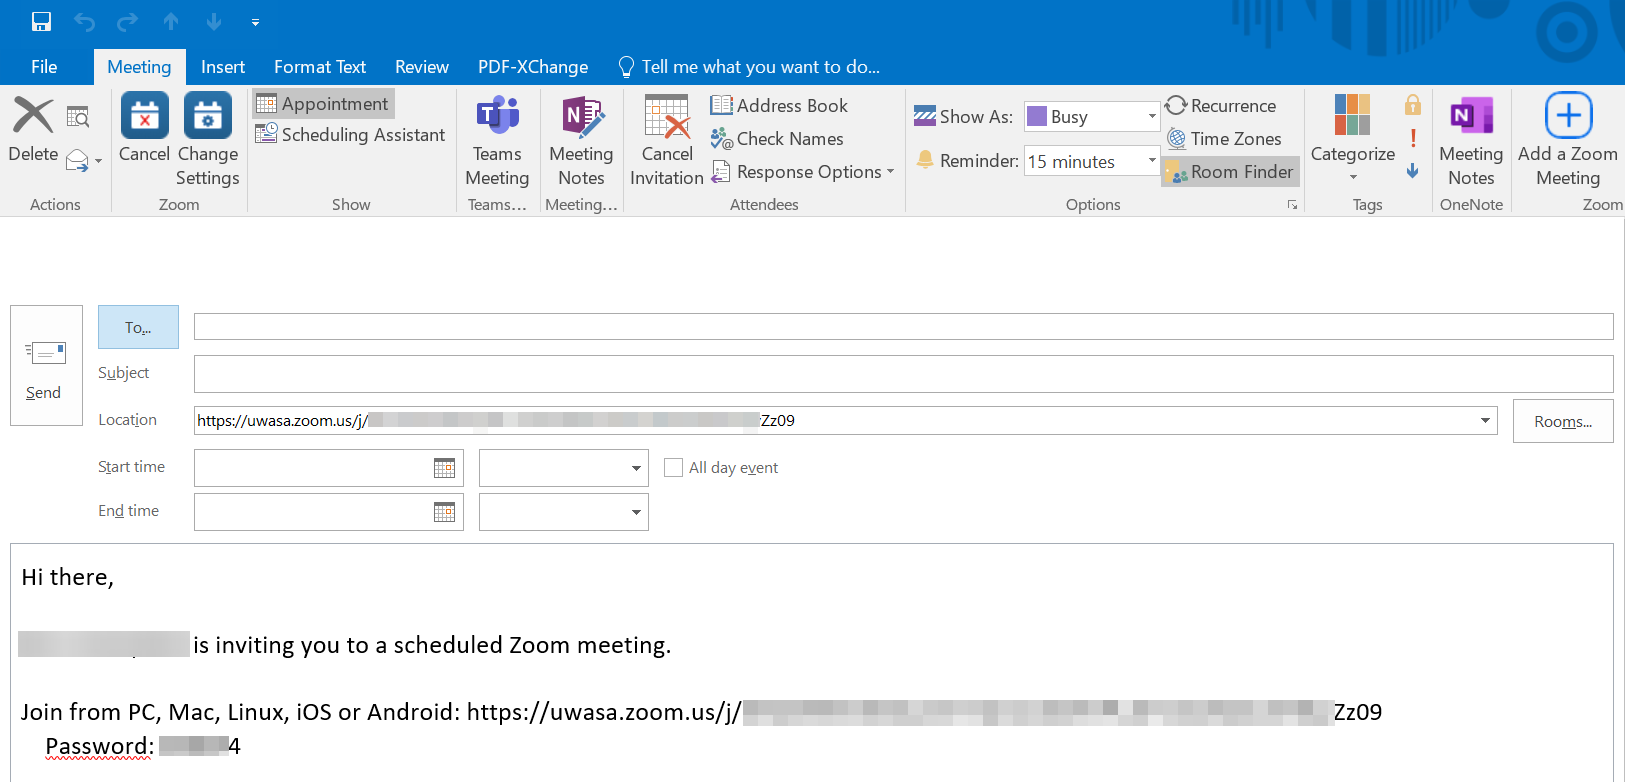
After the Zoom settings have been saved the meeting invite can be edited as usual by adding the email addresses for the participants along with the topic and time for the meeting. Zoom adds the link to the meeting directly to the message window, other parts of the message you can edit to your liking.
A zoom meeting scheduled in Outlook will be syncronized to Zoom app and are show on Meetings tab where the meetings are easy to start from. Starting a meeting is possible for the organizer even before the scheduled time so the meetings are not bound by the time assigned for the meeting.
Using the Zoom App
Use Schedule button to create a meeting in Zoom app. This button brings up settings for your meeting and accepting the settings brings up a meeting window in your calendar program of choice (usually Outlook) where you can proceed with inviting participants.
You can also send an invite separately by clicking the meeting's Copy button on the Meetings tab. The invite text and meeting link will be copied onto the clipboard and you can paste them to an email you want to send to the participants.
Instant Meeting
It is also possible to create an unscheduled meeting in Zoom which can be accessed by participants immediately. You can start an Instant Meeting in the Zoom app by clicking Start with video button and in Outlook by pressing Start Instant Meeting button in the top ribbon menu. You can invite participants to an Instant Meeting by clicking Invite button in the Zoom meeting window menu and by choosing Default Email. Your default email client will open with the invite and meeting link automatically added to the compose view.
Joining a Meeting
Your own scheduled meetings are best accessed from Zoom app's Meetings tab.
Meeting restrictions
A normal Zoom meeting has a maximum of 300 participants at a time. This limit can be temporarily altered to 500, please contact it@uwasa.fi if you are expecting a participant count of over 300 to your meeting.
You can be logged in to only one Zoom meeting at a time. If you join another meeting the previous meeting will end (and will also be ended for other participants if you are the host of that meeting).
Meeting Window Views
Zoom meeting participants can choose between two different meeting window views during the meeting.The view settings can be changed from the top right corner of the meeting window.
With Speaker view the participant who is currently speaking is presented in a larger frame at the center of the screen while the other participants are show at the top.
Gallery view displays all the participants on one screen in equal size (max 49 participants).
Sharing Your Screen During a Meeting
Share your screen from the Zoom meeting window menu's Share Screen button. Proceed to select what you want to share, which can be a single program window, your entire screen or Zoom's whiteboard.
Settings for screen sharing are available by clicking ⌃ -arrow next to the Share Screen button. In settings you can choose to limit screen sharing to only be available for the host etc.
Managing Participants
The meeting host can define participant rights to different activities in a meeting by clicking Manage Participants button in the meeting window bottom menu. This opens a list of the participants where the host can change participant right by clicking on the More button next to the selected participant. The host can give the host role to another participant, make recording the meeting available for a participant other than the host or put a participant on hold.
Make Host setting gives the participant the sole host role, so the original host no longer has this role. The original host can however always return to the host role by clicking Claim Host button at the bottom of the list of participants. Several concurrent hosts can be defined by choosing Make Co-Host for selected participants.
Recording a Meeting
A Zoom meeting can be recorded by clicking the Record button in the meeting window's bottom menu. The button opens a menu where you choose the method of recording, the recommended choice is Record to the Cloud. A recording made to the cloud is easy to share after the meeting has ended.
The recording can be stopped during the meeting but also ending the meeting will stop the recording automatically. After the meeting has ended the person recording will receive an email that the recording is now ready (along with a link that can be used to share the video). Most often the email comes within 10 minutes of the meeting ending but at times, especially with longer recordings, it can take a while longer.
Recording a meeting is permitted automatically for the meeting host only, but the host can grant other participants the right to record using Manage Participants button.
Note! The choice of meeting view affects the recording outcome, e.g. using Speaker View the recording only shows the screen with the speaker (or shared screen), other participants video is not recorded.
Chat
Discussion during the meeting can also take place with Zoom's chat functionality. Chat can be opened by clicking Chat button in the meeting window's bottom menu. You can send chat messages to everyone or privately to a specific participant by making a selection in the To menu of the chat panel.
Dividing Participants into Groups
Participants can be divided into groups by using Zoom's Breakout Rooms functionality (click Breakout Rooms button from the meeting window's bottom menu). Participants can be split into groups automatically or by hand. Meeting host can join in on each groups own room and can also send messages to all the groups simultaneously.
Securing Your Meetings
Zoom app provides many different possibilities to secure your meeting (e.g. practices to avoid unwated participants). During the meeting the security settings can be accessed by clicking the Security button in the meeting window's bottom menu.
The University of Vaasa's Zoom service is produced by CSC and Nordunet which means it differs from teh publicly available Zoom produced by Zoom Video Communications Inc in the USA. The University of Vaasa's Zoom uses servers located in the EU (Sweden).
Locking Your Meeting
When all invited participants have arived at your Zoom meeting, you can lock the meeting by choosing Lock meeting from the menu that opens when you click the Security button. After you have locked your meeting no new participants can join.
Meeting Password
You can add a password to your Zoom meeting when you are creating a new one. Before the participants can enter your meeting they will be asked for this password. The password can be set in the meeting options by choosing Require meeting password. When this choice is made Zoom adds a password automatically but you can also change this password to your liking.
When a password has been added to a meeting you have to share this password with your participants (in addition to the meeting link). The password is added automatically to the meeting invite under the meeting link.
Waiting Room
You can add a waiting room to your Zoom meeting and have your participants wait for your approval before they can enter. Choose Enable Waiting Room from the Advanced Options seciton of meeting options to turn this feature on for your meeting.
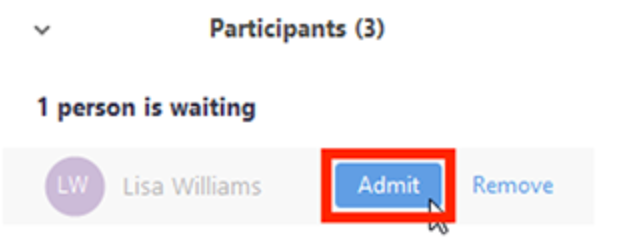 Waiting room can also be added when the meeting is already in progress by clicking the Security button in the meeting window's bottom menu.
With the waiting room in use the meeting host can let participants in by clicking Admit button in the Participants listing. All waiting participants can be let in simultaneously by clicking Admit all at the top right of the list. If unwanted guests are waiting they can be dismissed by clicking the Remove button.
Restricting Screen Sharing
Screen sharing can be disabled for participants when it's preferred that only the host can share their screen (e.g. in teching situations). To do this please deselect Allow participants to: Share Screen from the Security menu at the bottom of the meeting window.
Further information on securing your meetings